Cardigan Empire

Salt Lake City Fashion Stylist

  • ABOUT
    • Credentials
    • Press
    • Testimonials
  • SERVICES
    • Local Services
    • Fashion Lookbook
    • Shopping Session
    • Closet Cleaning
    • Color Analysis
  • FIT GUIDES
    • Top Jeans
    • Modest Shorts
    • Leggings Comparison
    • Find Perfectly Fitting Clothes
    • Best Swimsuits for Your Bottom
    • Best Swimsuits for your Belly
    • Best Swimsuit for Your Bust

Signature Style Makeover Week: Smile

A toddling run-in with the vacuum cleaner left my right canine cuspid a darker shade than the rest of my smile.  Too-young-for-tact children have occasionally asked why my tooth is very old or if I just neglected to brush it.  I affectionately call it hobo tooth. But following a two hours with my dentist’s hands wedged in my mouth, my dental discoloration is no more.

Knowing that the new little toothlet’s shade would be permanent, I made sure to brighten it’s surrounding mouth members to their optimum sheen in advance.  With Crest Professional White Strips I was able to sparkle my smile in just one use. If you’re looking to buy Crest Professional White Strips, find them cheaper with this promotional code. 

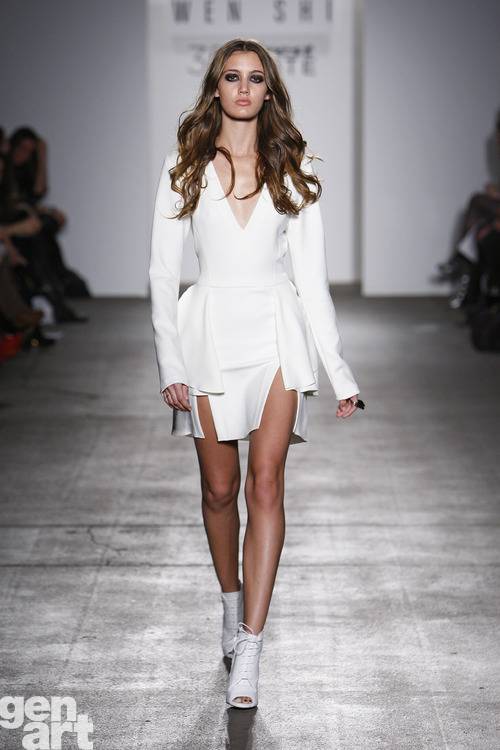
Now I am ready to wear Wen Shi’s dazzle dyed new capsule collection.  I want her to make me a slightly more demure version of this white wonder:


You can watch the rest of Wen Shi’s Little White Wardrobe Runway plus highlights from the award winning night hosted by Crest 3D White & Gen Art below.


Don’t die for more, answer your curiosity here


Sponsored by


Enact your smile transformation with Crest 3D White Intensive Professional Effects Whitestrips ($59.99).  Turnaround visible results in just one use, as stains are removed from below the enamel surface.   Wear strips for two hours, daily, for one week to enjoy the full transformation that would cost $500 in professional office treatments.

And I plan to keep my smile tidy with Crest 3D White Glamorous White Toothpaste.  It’s going to strengthen my weakened enamel and remove stains from my smile’s nooks and crannies by foaming its proprietary micro-cleansing whiteners into spots I wished I flossed more conscientiously.
Feed me fashionably fresh

posted Filed Under: Beauty

Signature Style Makeover Week: Hair

My hair from meeting Andrew to present
I’ve courted copper, and flirted with blonde, but I consider myself a committed brunette.  Yet my link to hue is far more fickled than my fierce loyalty to length.  I  can style everything from a pixie to a bob, but the expanse beyond the chin is uncharted territory. I’m a short hair girl, eternally, always.   
Except for now.  In response to the persuasions of a persistent husband, my hair now tickles my shoulders.  I have to brush it out of the way when I put on a coat.  And when I pull it into a pony, I actually have some sort of a tail.
Which is where it resides most of the time, in a high pony, commonly twisted into a tiny bun.  My hair is fine, and although naturally curly, at this length I’m lucky to sustain a soft, flat wave.  
In a mane induced milieu, I ran in for a professional consultation, with my stylist Leisel Decker, and received the following golden instructions following a trim and allover tint of brunette bordeaux.

And so I commence,  how to add volume and curl to fine hair using a flat iron:

Step 1:  Wash and condition the hair with a volume inducing product.  Your shampoo and conditioner are critical in prepping your hair for styling.

Step 2: Apply a volumizing foam and power dry the hair with a blow dryer.  Make sure you start drying without a brush, tousling sections in the opposite direction that they normally fall.  You want your hair to be 80% dry before you actually start styling it.  Round brushing sopping wet hair will increase your dry time, wear out your arms, and amplify breakage.

Step 3:  Spritz the crown with a root boost.  Then wield your round brush to finish drying the hair, focusing the direction of heat towards the ends of the hair.

Step 4:  Apply a heat protectant spray and comb through the hair to minimize damage and breakage.
Step 5:  Heat your flat iron to a low/medium temperate and begin building volume at the roots.  Clasp the flat iron around the base of the hair shaft than pull up and away from the head.

Step 6:  After boosting the crown, begin curling individual sections.  The smaller the section of hair you take and the slower you move it through the hair, the tighter the curl will be.  I wanted loose soft waves, so we worked through medium size sections, clamping the iron half way down the tendrils.  Once clamped you twist the wrist, wind the hair around the iron, then slowly pull out and away from the head while rotating the iron.

My stylist exemplified this process using the Missiko Hana Titanium Ionic Flat Iron

I like that it offers a range of heat options, friction free plates, and a tangle free cord, particularly crucial for avoiding third degree encounters when your twisting hair into curls.
Find all the hair products mentioned above with these Amazon Promotional Codes and purchase them for a bargain!
I’m going to try all my makeover trips for a big reveal.  Stay tuned.
In the meantime, what’s your best hair styling tip?

Feed me fashionably fresh

posted Filed Under: Beauty, Hair

  • « Previous Page
  • 1
  • 2
  • 3
  • 4
  • 5
  • …
  • 10
  • Next Page »

Categories


spacer
spacer
spacer advertise

Copyright © 2023 · Cardigan Empire on Genesis Framework · WordPress · Log in